Every startup wants to save money, and one of the ways to do that is looking closer at AWS expenses. We want to share our story on how we are able to maximize AWS usage while we minimize cost. Having a team of highly skilled engineers isn’t always enough to manage costs – you will also need the right mixture of skills to make it work. In this blog, we share 7 ways Artera regained control of AWS costs.
My area of expertise is Systems and Infrastructure, so that is the primary focus of this article. You can also improve savings with an AWS Enterprise Discount Program Agreement (assuming an Enterprise Support account). Additionally, you can tune savings with Reserved Instances and Savings Plans.
In order to be effective, you’ll want someone on the team who is familiar with AWS services, especially the ones that have been in use within your organization. You’ll need someone who is intimately familiar with the architecture of your environment and network.
First of all, try not to panic. It’s imperative to identify what can be destroyed as well as what cannot. While money is on the line, a mistake can prove to be even more costly.
1. Documentation
Knowing what comprises your environment or system as a whole is crucial to being able to control costs. It is important to maintain a set of documents in one easy-to-access location that describes the entire system and the parts that it is comprised. This will give future explorers the ability to quickly identify resources that have fallen into disuse.
Understanding the complexity of your networking can go a long way towards identifying runaway costs, like cross-AZ traffic.
2. Auditing
Starting with AWS Cost Explorer, identify the largest cost resources. Compile a list of high-level AWS Services that you believe you can find savings in. Maintain tickets for each service and document everything that you believe may be safe for removal. Talk to subject matter experts in your organization to get better context. Update the aforementioned documentation with all relevant details.
If you do not already have tags associated with these resources, do so in bulk with AWS Tag Editor. This will help you with organizing resources. Some ideas for tags that may be helpful: “Ticket,” “BillingDepartment,” “ProjectName,” “Environment.” Tagging the ticket name gives future engineers a great starting point when further details are needed into the context of why something was created. BillingDepartment, ProjectName, and Environment can be leveraged to assign costs, in addition to general reporting.
Keep track of your expected savings in your tickets! Saving money can be extremely gratifying. Get an average monthly cost for the past several months and compare that to what you expect to change, based on AWS Pricing for that Service.
3. AWS Services
Knowing how to compare AWS Pricing on a per-service basis is very important here as well. They will have a pricing page that spells out how charges will be applied for each service. If your application is heavy on compute (or memory), you may find savings by switching instance types. Reserved Instances or Savings plans are a great way to save money (but first use Cost Management’s Rightsizing feature to identify over-provisioned instances).
Amazon Relational Database Service Snapshots can be costly. Tune those down to the minimum number that you could safely operate with according to your Service Level Agreement, and send everything else to S3.
Amazon Elastic Block Store Snapshots should have a Lifecycle Policy to prevent them from growing forever. This will allow you to set a maximum number of snapshots, and when to create them.
These are just a few examples of the incredible number of AWS Services with varying ways for costs to spin out of control. The important thing is for your team to understand how the costs can get out of control ahead of time.
4. Security
Having a good security posture is also important in preventing runaway costs. Limiting access to the creation of resources may seem obvious. While we should have a certain level of trust in our team, implementing logical restrictions can help prevent accidents. More importantly, enforcing MFA and password/key rotation prevents unwanted intruders from leveraging your AWS Account for their purposes. Additionally, you can disable regions that you do not use.
Providing network routes to AWS Services that you use will prevent Egress charges for those services, as the public IP’s being sent will not have to egress the NAT Gateway. An example here would be storing large files from an EC2 instance to an S3 bucket. Without a VPC Service Endpoint, the traffic to S3 would have an applicable charge of $0.09 / GB. There are plenty of options available here.
5. Backups
We all want our data to be safe and backed up regularly. Doing so doesn’t have to be expensive. Wherever possible, define safe limits for your backups as mentioned earlier with RDS Snapshots and EBS volumes. Set up the appropriate automation to send anything older than the defined time frame to S3 for long-term storage. Set up an S3 Lifecycle policy to expire anything after that data is no longer needed. Be sure to check with your Data Governance expert.
Before you destroy an resources that were located during the Audit process, determine if a backup is needed. In many cases, it may not be necessary. For those cases that do, the least expensive option for disused data would be S3 Glacier Deep Archive. You may want to start with S3 Glacier Instant Retrieval during the initial termination of resources, in case something becomes necessary.
Some resources may require additional documentation before destruction. When you’ve inherited an environment, you likely also inherited tech debt! If someone hard-coded something (like an IP address), you may run into trouble later. Maintaining documentation on what is to be destroyed and what the configuration was may prove useful later on. This kind of tech debt takes many forms, so it’s really up to your discretion as to what is best to document in your use case.
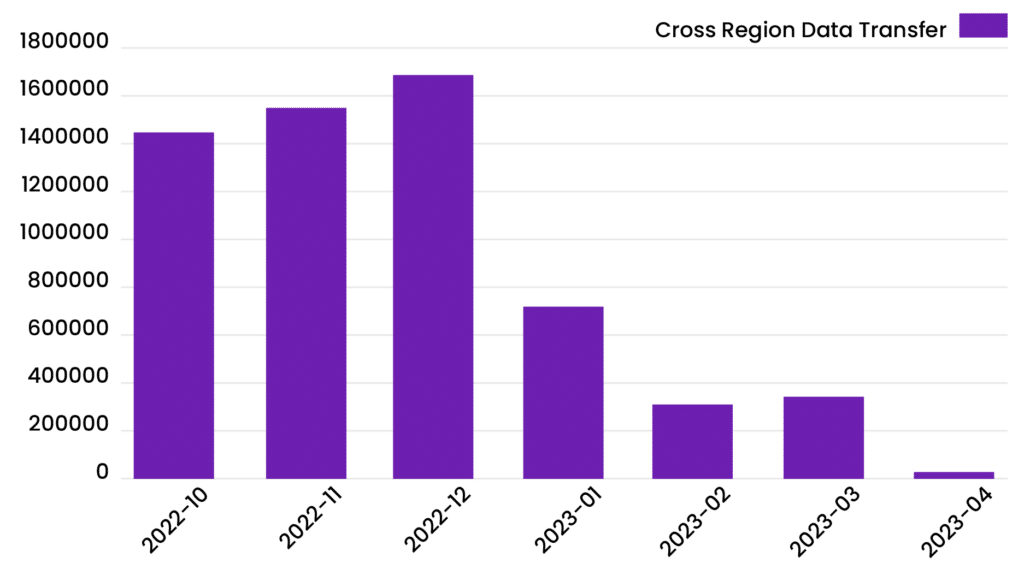
An example of tech debt that our team inherited from long ago that proved costly was a multiple AZ backup system. Amazon Machine Image, EBS volumes, and RDS Snapshots were being stored indefinitely and were being copied to multiple regions for a disaster recovery scenario that was never implemented. Costs involved were Cross AZ data transfer, Lambda invocation time, and Storage. Because so much data was being transferred, and to multiple locations, the costs were in the tens of thousands of dollars per month. While the original team that put this solution together likely had the best intentions, forecasting the cost on a moving target (database size increasing over time) is difficult.
6. Destruction
This is the fun part! All of the resources that you’ve identified and documented for destruction (and possibly backed up) can now be destroyed.
Communicate these changes with all parties that could conceivably be involved in an unexpected outage. Plan a way to revert your changes if possible. In many cases (such as outdated snapshots or disused EBS volumes that haven’t been attached recently), an outage isn’t to be expected, but something may come up later. Communicating early in the game, as well as just prior to execution is a good way to get insight from people who may have historical knowledge of the resources in question.
If you’re using some sort of Infrastructure as Code to destroy resources, use great caution to review what resources are to be destroyed. Once you hit destroy, you may get a sudden adrenaline rush and think, “Did I just destroy the wrong thing?”. Once things start to disappear, and you’re sure you’ve confirmed all is well, you may just find yourself wanting to see the results to your monthly costs!
7. Monitoring
While making changes, it is important to keep a close eye on your infrastructure. Did something change after you deleted an EC2 instance? Best to know sooner rather than later!
Unfortunately, you won’t get immediate feedback on cost savings. You’ll want to check Cost Explorer the following day and set it to Hourly for review. Once the new metrics have been rolling in for a few days, you can start comparing your initial cost analysis with what AWS costs have actually changed.
Once the metrics for pricing have normalized, start setting up AWS Budgets that make sense for your organization. You can create a Budget for each service you use and set it to alert based on the estimated dollar amount. This will help keep costs from spiraling again unchecked.
Results!
Shown in Usage Quantity, below is a visualization of the result of our RDS backups, which we now only store as long as they are feasibly useful:

Not all results will be as dramatic, but when combined with quickly add up! Below is the output of our EBS Volume usage:

Another fine example of cost savings was cross region data transfer of backups for disaster recovery purposes. Identifying only the data that needs to be replicated for disaster recover, and limiting transfer is another excellent money saver:

Summary
Don’t panic! Get the right team of experts together to work on this project. Communicate often, with as many people as possible. Document everything, and keep that documentation up-to-date. When in doubt, make backups (as cheaply as works for your organization). Monitor your changes (Billing and Service-wise)!
Most savings will come in the form of old resources that are no longer in use. The key is to know (or learn) what is in use, and what can be disposed of. Once you and your team have a full understanding of your infrastructure, destroying unused resources comes easily.
Legal Disclaimer: The contents of this post as well as the opinions expressed herein do not contain business advice. The business information provided is for general informational and educational purposes only and is not a substitute for professional advice. Accordingly, before taking any actions based upon such information, we encourage you to consult with the appropriate professionals. THE USE OR RELIANCE OF ANY INFORMATION CONTAINED IN THIS POST IS SOLELY AT YOUR OWN RISK.


